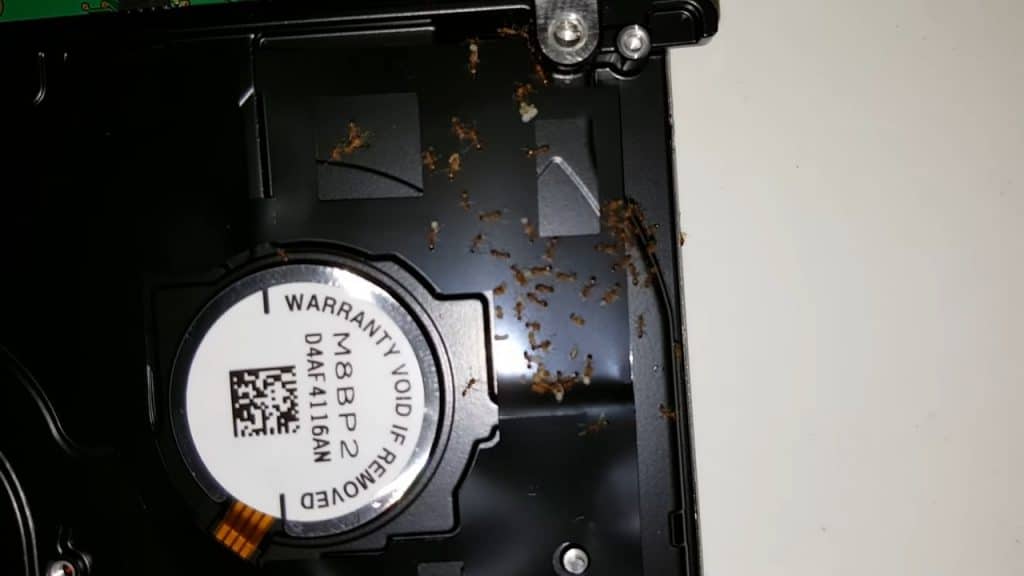
An ant infestation in your HDD might sound like something absurd and impossible, but ask any IT guy who is long enough in business and you will see how common it is. Ants now and then can nest in your HDD for several reasons, and they can be a real pest about it.
One of the best ways to get rid of ants from your HDD fast is to vacuum them with the aid of a brush. If the vacuum is strong enough you’ll be able to clear most of them in a blink of an eye.
For a quick fix, this is ok, but you’ll need to take preventative measures so it won’t happen again. But keep reading and we’ll get to that, in this article you will find all the information regarding to an ant infestation in an HDD and what to do about it.
Can Ants Damage an HDD?
HDDs are sturdy computer components, but an ants infestation may damage them easily. This will happen if the ants end up overheating the HDD, or damage its electronic circuit board.
Another reason why it may become damaged is if ants begin to use them as an egg farm, they can store all their eggs in them (the white stuff you see them carrying around), and these eggs can generate some moisture in the circuit board and damage it.
Why Are Ants Attracted to My HDD?
Ants can be attracted to your HDD for several reasons such as:
- Ants will use your HDD because the HDD heat can get them warm in cold environments.
- They are attracted to the electric magnetic field created by the HDD itself.
- The HDD provides enough shelter and an ideal temperature to hatch some eggs.
- It can be a nice hideout because it’s tucked inside a computer and it is away from prying eyes.
How to Clean Ants From My HDD?
There are some rules to do this. We’ll break it down for you step by step.
1. Turn off Your Computer
Never attempt to do this cleanse with the computer on, you might damage other components or get an electric shock. So, for your safety and others, always shut down your computer.
2. Disconnect All the External Cables
You could just remove the cover panel and start doing the job immediately, but just like the previous step, you can damage other components that are in the way, the best way to do it, is by disconnecting all the cables first making the access to the HDD manageable.
3. Move the Computer to an Open Area
This is something many people don’t think through and then regret about it. Always move your computer to an open area to extract the HDD, why? Because there is a good chance that ants will start running around everywhere.
If you don’t want other areas of the house or even your desk with ants, you should move your computer case or laptop to an open area and start cleaning there. If ants start running around, you’ll have plenty of space and time to dispose of them there.
Bonus: Ants infested your whole PC? Just do this! You can thank me later. 👌😎😎😎
4. Remove the HDD (Hard Drive)
If you have some kind of allergy to bugs don’t forget to put some gloves on (don’t use thick ones you might lose sensibility). Remove the hard drive gently and with a brush start removing any ants and eggs attached to it.
If you have a powerful vacuum get it running, and brush the ants towards the vacuum tube, this will aid you in your removal process and it will make things less messy. If some ants escape during the process, you can always vacuum them later.
If your vacuum has a bag, don’t forget to take it off after you’ve finished and seal it, if it has a dust compartment empty it in a toilet and flush it. This way you are securing yourself that no ant will come back.
5. Clean It Up (Optional)
After your HDD is ants free carefully examine it, if it has ants residues or anything ant related in it, you should clean it. You can do this by using isopropyl alcohol and a dry toothbrush.
Dip the brush in the alcohol and brush whatever needs to be cleaned, don’t drip the HDD in the alcohol and try not to use too much alcohol, if it enters inside your HDD then you’ll ruin it.
6. Check for More Ants
Before putting your HDD back in again, check the computer/laptop for more ants, you’ll need to remove them all before mounting the HDD. If you fail to do this, you’ll risk having an ants nest again in a short period of time. Remove any presence of ants and carry on.
Pro tip: Ants are gaming with your GPU? Just follow this! 🎮😎😎😎
7. Assemble Again
Time to assemble again, while you’re in there don’t forget to clean the mounting bracket as well, any ant smell might attract other ants to check what’s going on. So keep it clean and nice to avoid situations like that.
Will Ants Return to My HDD?
There is always a chance for ants to return to your HDD if you have an ant infestation in your place. If you deal with that, the chances of that happening again will be very reduced. Keep an eye on the next weeks to see what happens.
If you notice any ants around, start by checking your HDD again. If not, I think it’s safe to say that you are good for a while. Every time you notice any ant, start by checking the usual spots, this will give you the upper hand while fighting them.
How Can I Prevent Ants From Coming Back to My HDD?
You can really avoid ants just by doing prevention, the best way to prevent ants from coming back to your HDD is by not eating around your computer, by cleaning weekly the space where you use it, and by checking from time to time your HDD state.
Follow these rules and you are set to go.
Conclusion
Ants can really be an unpleasant surprise, especially when found in the most inconvenient places just like your HDD. It can be a burden having to take it out and clean it, but it is best to do it while you can unless you want to risk any damage to it.
Luckily, that can be done without any major tools, you just need a little bit of patience and time. Clean your HDD and keep those pest ants away.
